Creating a Face Rig With Joints and Blend Shapes
- Alexander Wagner

- Jan 6, 2020
- 9 min read
Updated: Dec 9, 2021
What makes a good face rig? Throughout my time learning rigging practices I have grown to love face rigging the most. My senior project for art school was a F.A.C.S joints based rig. The face rigging project after that was an Osipa style rig with blend shapes. There has been a lot of experimentation with this facet of rigging. Every face rig I have created since my first has used a different process. This shows many different possible solutions available to us as character riggers. There are even entire books on this kind of face rigging alone. In this post I will be going over deformation theory and an in-depth look at this process for creating this rig. Let's begin!

Pros and cons of using blend shape based deformation
PROS
I would say it's safe to assume that most riggers first face rig are built using blend shapes. There is a good reason for this to be the case. This process doesn't rely heavily on skin weighting. This makes setting up this type of rig straight forward. Blend shapes provide animators with extremely clean shapes that stay on model.
Blend Shape based deformation is exceptionally fast. Because Blend Shapes are fast, they should be implemented as often as possible. there is a simple reason why they are so fast. The Blend Shapes are driven linearly. In fact, the algorithm that drives the Blend Shape node is a familiar equation. Here's a look at how the Blend Shape node calculates Blend Shape vertex positions :
y = m × x + b
current vertex position = (vertex position deltas) × (target weight) + original vertex position.
CONS
Because Blend Shapes are fast, they are not ideal when it comes to transitions between poses. This type of face rig works with predefined shapes. Which means it is when it comes to secondary animation. An animator that has secondary controls is a happy animator.
Blend Shapes are an additive function. Because of the linear and the additive nature of Blend Shapes, we need to account for something called double transformation. Getting smooth and arcing transitions are difficult with this kind of deformation. With these notes in mind, it's important to understand how this system works before it's applied to a rig.
It is important to note that the linear deformation of blend shapes is not as much of a hindrance anymore. Rigging artists now have access to a beautiful tool called the Radial Basis Function solver. This actually utilizes the same math that is used for machine learning. It creates various types of arcs between poses, among other functions.
Pros and cons of using joint based deformation
PROS
Some more advanced face rigs tend to use joints to deform the face. Because the face rig joints are actual objects transforming in 3D space. Keying the joints provides smooth interpolation between poses.
Depending on how the rigger setup up the controls the animator will also have far more control over the deformation. using joints also allows the rigger to setup up secondary controls. This brings us back to my previous statement. An animator that has secondary controls is a happy animator. We like it when our animators are happy. As a side note, this approach requires the rigger to have their weight painting skills on point.
CONS
The biggest downfall of using joints is that they don't grant the same kind of fidelity as Blend Shapes. While the rigger can use more joints and to achieve a higher definition of deformation. However, it will likely never be able to achieve the same result as Blend Shapes.
Blend shapes and joints in one rig
If we combine Blend Shapes and joints we can achieve the fidelity of blend shapes with the flexibility of joints. We will be able to stay on model with the shape based poses. We will also be able to use joints for an additional layer of control. This gives animators the ability to manipulate every aspect of the characters face. Combining these two kinds of deformation will create an well rounded rig that animators will love.
Face joints setup
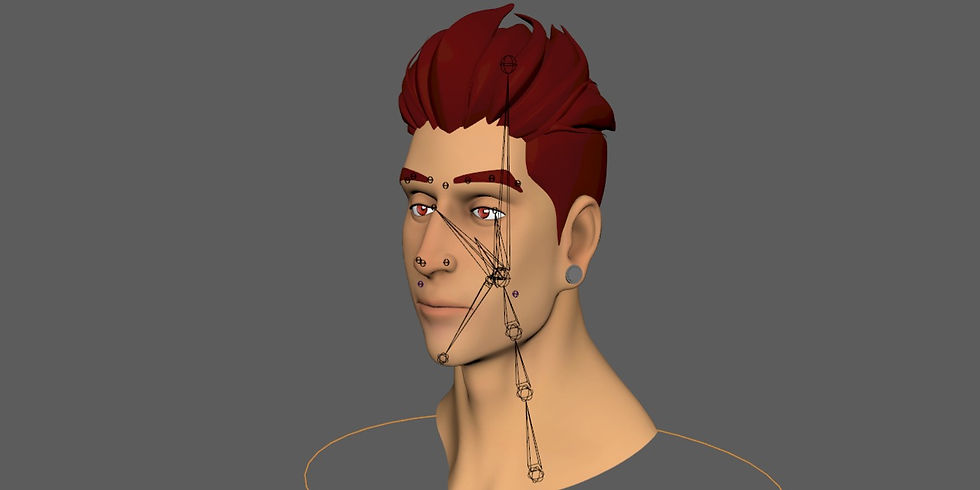
The basic face joints
When it comes to setting up the joints for this rig we need multiple smaller rigs to achieve the functionality that we want. We need our eye to be able to blink and stay shut when the eyes move. We will also need the lips to seal and remain sealed when the jaw opens. The basic face joints should be the nose, cheeks, and eyebrows.
Eye rig

For the eye rig I suggest using a curve system that drives joints. There is a wonderful tutorial for cartoon style eye rig by Marco. The way this rig is set up allows a great amount of control over the eyelids. This includes smooth deformation, and secondary controls.
Mouth rig
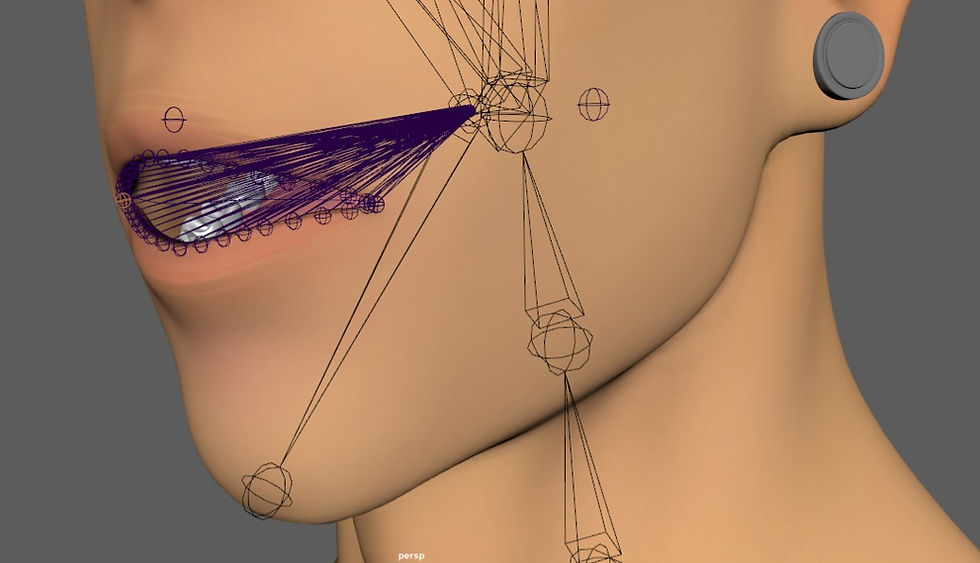
Most of face rigging will be spent on the mouth rig itself this goes for the Blend Shapes as well later. The process for creating the mouth rig is similar to the eyes. The way the controls are setup for the mouth rig lends itself well to how we will implement our Blend Shapes. The features of the mouth rig will be lip seal and zipper lips. lets take a moment to briefly talk about these two important features. Almost every animator I have rigged for has told me they need the character to have a lip seal function. This allows animators to animate the character chewing food. The zipper lip function works in conjunction with the lip seal. It allows the animator to progressively control the lip seal from the corners of the mouth.
Face blend shapes setup

Sculpting the different blend shapes
Because we are doing an Osipa style face rig we will be sculpting four basic mouth shapes. These basic shapes will be the foundation for the rest of the face. The shapes will be smile, frown, narrow, and wide. The reason we do these shapes is because they have a lot less chance to interfere with each other. Meaning it will keep the double transformations to a minimum. This also allows the animator to work with more flexibility. Something that phonemes can't provide.
When sculpting the Blend Shapes it is also important to divide each shape into left and right shapes. This will give the animator the ability to control different sides of the face. Flexibility makes a face rig wonderful.
Creating corrective blend shapes
Most of the time when we use Blend Shapes, two shapes may not work together too well. In these cases we will need to use another layer of deformation called Corrective Blend Shapes. Riggers tend to use these shapes for neck when the jaw opens. Another example of when we will most likely need to use correctives is when we the smile and wide Blend Shapes active at the same time. That brings us to needing four more Blend Shapes that we need to sculpt. These Blend Shapes will be, smileWide, smileNarrow, frownWide, and frownNarrow. Again, these mouth shapes will need to split into left and right side shapes.
Deformation order
When we apply multiple deformers to a mesh. Maya must evaluate each deformer individually. Deformation order refers to the order in which Maya will evaluate deformation nodes connected to a mesh. Because we are working with two kinds of deformers, we need to make sure they work in unison. When we move joints that will deform the bound mesh. Since Blend Shapes are additive in nature once we activate a Blend Shape it will deform the mesh once more. This is another case of double transformation. Therefore, we must understand what deformation order is. In this case, we need the need our Blend Shape node to evaluate before the Skin Cluster node. In the Blend Shape menu this is the pre-deformation option. Once we have the deformation order set, we will notice that the Blend Shapes still don’t work the way we expect them to.
Extracting shape deltas to work with joints
Even with the deformation order set correctly the Blend Shapes wont quite play well with the joint deformation. This brings us to the next concept; extracting deltas. Let’s get into the theory about this so we understand how it works.
I will use the example of having two Blend Shapes not working together the way we expect them to. Let’s refer to the incorrect shape as “Shape A.” Then we will refer to the desired shape as “Shape B.” In order to get the corrective shape, we need to calculate the vertex displacement for each vertex. This also needs to take into consideration vertex normals. Here is a simplified formula for how the delta extraction works.

Vector ″ - Vector ′ = Vector Δ
Shape B vert position - Shape A vert position = Vert position displacement
We can use this algorithm in conjunction with some linear algebra to create a tool that will do this for us. Luckily, we have much more convenient options for extracting the mesh deltas. There are multiple plugins on the internet that will accomplish this task. I highly recommend Chad Vernon’s shape inverter. It’s about as intuitive and efficient as they come.
There is also a more hands-on process that doesn’t involve installing a plugin or writing your own API heavy tool. This option involves the use of the Blend Shape node. We take Shape A and Shape B then apply them both as Blend Shapes to the bound mesh. Set the weight value for Shape A to -1, and the weight value for Shape B to 1. The result will be a mesh with proper displacement values. With these corrective shapes we can now make our deformations look the way we intended them to.
Creating a node network for the face rig
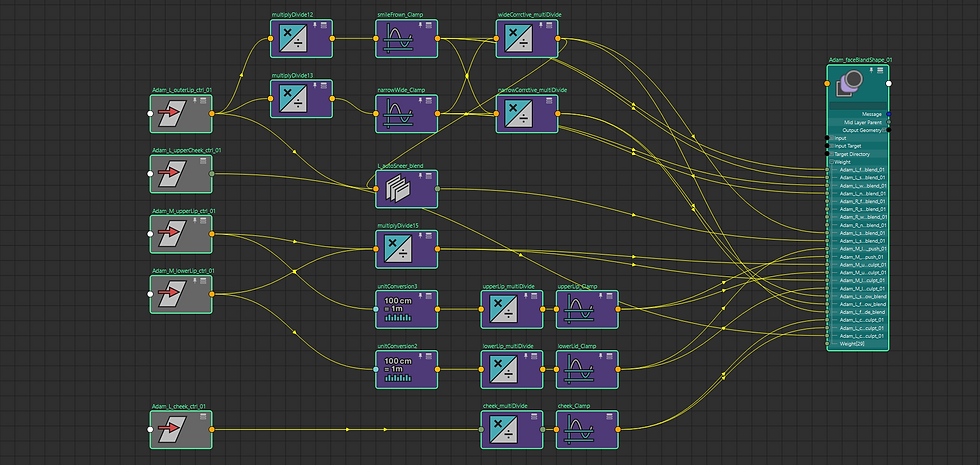
When I first learned how to rig a face, I used expressions as a buffer between the animation controls and the Blend Shapes. Expressions work well enough for most rigs. However, we can get the most efficiency out of a rig with the use of utility nodes. Utility nodes evaluate faster than expressions.
The buffer network manipulates the input values into a more usable data set. This means that we need to take the translation values and filter them. The translation values need to be filtered into weight values that the Blend Shape node can use. Once we have weight values, we can manipulate them further for more rig features.
Multiply/Divide Node

The multiply/divide node takes in three pairs of
inputs and evaluates them based on the function selected. This node can also evaluate input data
using exponents.
Condition Node

Using the condition node in the rig allows the rigger
to add complexity to data. This node will be used to control the flow of data through the node network.
Clamp Node
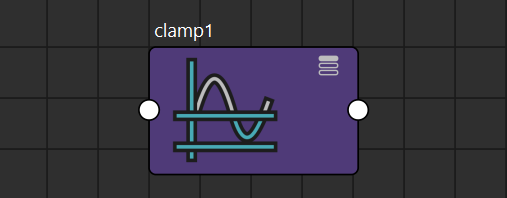
The clamp node allows us to set a maximum and minimum cap on the input data. This will prevent
the blend shapes from being over driven.
Blend Weighted Node

The Blend Weighted node is created when we
assign two drivers to a single driven attribute using
Set Driven Keys. This will become very useful for blending between the smileWide shape and the
sneer shape. It's important to fully understand how this node calculates the output.
Reverse Node

The reverse node will be used to suppress unwanted blend shapes. This will become very useful for driving the Smile/Wide shape while suppressing the each Smile and Wide shapes.
Blend Colors Node

This node gets used for many kinds of rigs. I’ve seen
it‘s most commonly used for FK/IK switching. It can
also be used to make a lip seal, and zipper lip on a mouth rig.
Plus/Minus/Average Node

This node is essentially an add/subtract node with more functionality. One practical application for this node is for making stretchy IK limbs. It would be used to keep tack of the sum of the limbs joint length.
How to make the blend shapes work
Now that we have a list of all the nodes we will need for this rig lets take a look at how to make the Blend Shapes work together.

We want the left and right mouth controls to also activate the Blend Shapes of their respective sides. When we break down the controls into the individual axes, x and y for example, we're working with raw translation values. These values will most commonly range from -1 to 1. if we take the mouth control and drag it along the x-axis we are working with translation values. The Blend Shapes work best with weight values that range from 0 to 1. In some cases these values can exceed the limit of 1, and the Blend Shape node will interpolate the over driven values. But for purposes of this example we will work with the standard weight values.
Let's use a combination of the multiply/divide and clamp node to filter the translation values into the standard weight values. From the we can connect them to their respective Blend Shapes. Once we have our basic Blend Shapes properly connected and activated by the controls, we can now setup the corrective Blend Shapes. Let's use the Smile/Wide corrective as an example going forward. There are two options going forward.
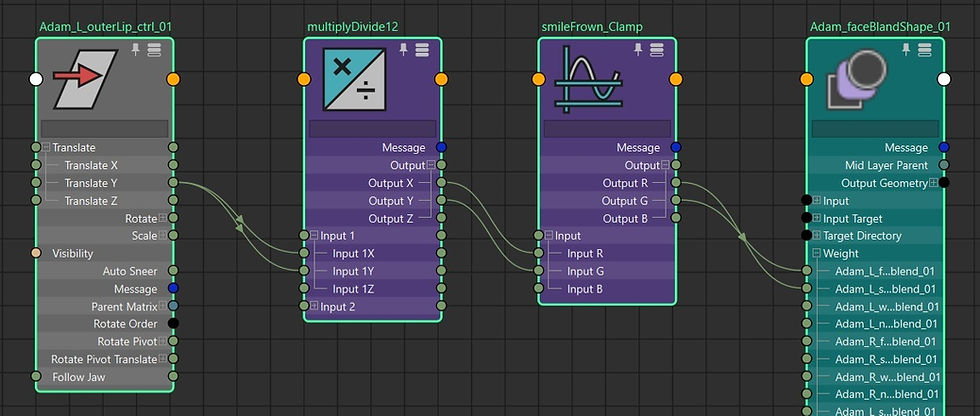
The first option will involve activating a corrective Blend Shape on top of the smile and wide shape. This Means all the shapes will be active at the same time. This will only involve a singular multiply/divide node. The second option is to blend the values between the two basic shapes and the corrective shape values. As the smile/wide corrective is activated, the individual smile and wide shapes will deactivate accordingly. This setup is a little more intricate, but is achieves the same result as the first option. So for simplicity, I will demonstrate option one.

For the Sneer and Pucker Shapes we will need to use the blend weighted node. let's setup the sneer shape. the sneer shape is essentially the exact shape as smile/wide shape. The difference is the upper cheek is pushed up and forward in a more exaggerated manner. This will need us to blend between a custom auto sneer attribute value and the smile/wide value. With the attribute set up this way the animator can seamlessly turn the smile/wide shape into the sneer shape.

And here is the result of our work. Let's let's at the Adam face rig.
With all the concepts put forth in this post I hope this has been insightful for you, the reader. I always highly recommend experimenting with utility nodes to come up with new kinds of rig features.
Learning material and tools
Jason Osipa - Stop staring 3rd edition
3D advanced rigging and deformation
Chad Vernon - Shape inverter
Marco Giordiano - Cartoon eye rig


Comments